


Tuesday, 28 October 2008

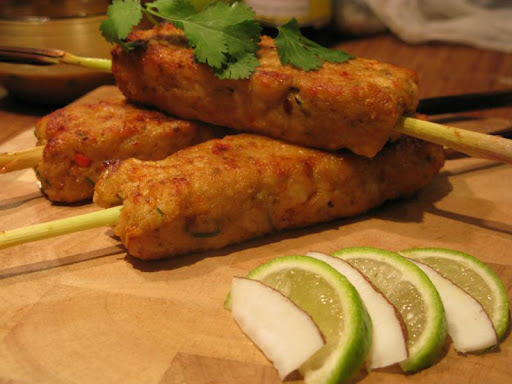
A bit more news... and Coconut Spiced Kangaroo Kebabs

More news!

I have booked my flights for my trip! I leave England on the 30th November, flying to Bangkok. I'm feeling so many mixed emotions right now that I don't know quite what to do with myself. Taking myself to the pub for a calming glass of red is an option!

Anyway, before I do - here is the first of my recipes from my recent international dinner party!

This is the first course I served in my recent 24, 24, 24 meal - an Australia dish for my friend Belinda! (Psst... I'm going there :P )

I had heard a number of times that kangaroo is notorious for being tough, and that it should never be cooked more than medium rare. It is a very lean meat - and so it is easy to dry it out. To help make it as tender as can be, I marinated in in a mixture of orange juice, coconut milk, lemon grass, ginger and garlic.

Coconut Spiced Kangaroo Kebabs

Feeds 6
  • 300g kangaroo fillet
  • 150ml coconut milk
  • 150ml fresh orange juice
  • 2 stalks lemongrass
  • 1" ginger
  • 2 cloves garlic
  • 1 thai red chili - seeds in
Blitz the lemongrass, ginger, garlic and chili to a fine paste - add a bit of OJ to thin it out if required.

Stir in the coconut milk and orange juice.

Dice the kangaroo fillets into 1" pieces, and add to marinade. Allow to soak for at least 3 hours - or overnight.

Thread the marinated meat onto soaked bamboo skewers.

Preheat a grill (or broiler) as hot as it can be. Grill the kebabs for 3/4 minutes on each side - do not overcook!

Allow to rest for 5 minutes before serving. Serve with a scattering of fresh cilantro!

Thursday, 28 August 2008

RFJ: Double-Dipped Ginger & Orange Oaty Bites

I won, I won, I won! :D


And this morning I got my apron in the post! No pics of me in it as yet (and definitely not in the Greek style!) but I'll see what I can rustle up over the weekend!

The Royal Foodie Joust is a monthly event hosted by Jenn the Leftover Queen. Last month the selected ingredients were Sesame, Seafood and Cilantro - and my submission was voted top - an incredible honour.

As well as the prize of an apron, I was allowed to select the three ingredients to be used for the following month's event. I chose whole grains, ginger and citrus.

Check out all the submissions here - and if you have a food blog, be sure to vote next week!

And here is my submission!

Double-Dipped Ginger & Orange Oat Cookies

  • 1 orange, juice and zest
  • 2 tbsp runny honey
  • 2 cups rolled oats
  • 2 cups wholemeal flour
  • 2 cups sugar
  • 225g butter
  • 0.5 tsp bicarbonate of soda
  • 1 tsp baking powder
  • 1 tsp ground ginger
  • 75g crystalised ginger, chopped
  • 100g plain chocolate
Heat your oven to 175c.

Prepare the Cookies...
Mix together the oats, flour, sugar, baking powder, ground ginger and chopped crystalised ginger.

In a pan, melt the butter with the honey, orange zest and juice. Once completely melted, add the bicarbonate of soda, stir to mix in, then add to the dry ingredients. Mix well - the mixture should be crumbly, but hold form when squeezed.

I wanted to make small bites rather than huge cookies, so I rolled these into small balls about an inch an a half across. I put them on a lightly greased baking sheet and pressed to flatten slightly. Make sure you leave room for them to spread!

Bake the Cookies...
Pop in the oven and bake for 12-15 minutes - do not allow to colour too much!

Take them out of the oven and allow to cool before attempting to move them.

Dip the Cookies...
Meanwhile, melt the chocolate in whatever manner you see fit. (Not by chucking it in a pan over direct heat. Trust me - this never works!)

Once the cookies are cooled, dip their bases into the chocolate. Drip off the excess and put onto a flat surface. Put into the fridge until set.

I wasn't happy by the amount of chocolate that clung to my cookies - so I repeated this step - hence double-dipped!

Serve with a good strong coffee. Not for children!

Friday, 22 August 2008

More noodley goodness: Orange & Ginger Soba Noodles

I found this recipe a while back, on my first visit to the beautiful vegetarian Indian food blog, Saffron Trail. And despite never having tasted it, I got a real craving for it a couple of days ago!

It's basically a noodle dish with a nice bit of steamed veg... and a gorgeous orangey, gingery, peanut butter dressing! Yum. I mixed the dressing up, and I could have probably eaten the lot of it with a spoon! (Peanut butter soup!!) I think this dressing would go amazingly well as a dipping sauce for chicken too.

While the original recipe calls for smooth peanut butter, I only had crunchy at home. While I probably will try it with smooth when I get a chance, I really liked the extra texture that the crunchy peanut butter added.

This is a great dish, quick and relatively healthy. I made up a batch in the evening and had it for dinner, then took the leftovers to work the next day. You must do this!!! It was even better on day 2!

Anyway, happy Friday everyone! Long weekend for me due to a public holiday... to celebrate I'm heading up to Notting Hill Carnival! Cross your fingers for some sun!

Orange & Ginger Soba Noodles

Serves 4...
  • 3 tbsp crunchy peanut butter
  • 2 tbsp toasted sesame oil
  • 3 tbsp soy sauce
  • 1 tbsp grated ginger
  • Juice and zest of one orange
  • 1 tsp red chilli powder
  • 250g soba noodles
  • 6 Runner beans, cleaned and thinly sliced
  • 3 carrots, ribboned
Prepare the Dressing...
Whisk together all the ingredients except the noodles and veg - taste and adjust seasoning or acidity - I added a dash more orange juice and another dash of soy. Set aside.

Prepare the Noodles...
Cook noodles according to packet - probably 5/6 minutes. Drain and rinse under cold water.

Prepare the Veg...
We want these to be super lightly steamed - the crunch of the carrot ribbons go so well with the silky noodles! So maybe 3 minutes for the beans, and just a couple of minutes for the carrots.

Chuck it All Together!
If you want to eat this warm, heat the noodles by pouring boiling water over them. Mix together the veg and noodles; give the dressing a last whisk, then pour it over the top.

Mix through so that all the noodles are coated in the dressing.

If you fancy a faff, decorate with some raw carrot ribbons and orange segments. Or not!

Either way, tuck in, slurp it up, and wonder why you've never tasted gingery orange peanut butter before... Enjoy!


Another Friday trio!

This week I'm going to send this over to Ruth at Once Upon a Feast for Presto Pasta Night! Though I think I'm early - at time of writing the last round up hadn't even been posted!

Its near the end of the month, so a cheap dinner is even more appreciated than usual. And that's why I'm going to send this to Frugal Fridays! Even taking into account that I used posh organic soba... this would feed 4 for about £4 - or ~ $8!

And finally, this is my second submission to Ruth's Bookmarked Recipes event. Check out the round up on Monday!


Presto Pasta Nights Frugal Fridays

Monday, 16 June 2008

Think Spice: Wasabi Fried Beef with Ginger Crisps

This month Think Spice is hosted by Krishna of Cooking from A to Z and features wasabi. It's a great choice - I can't wait to see the different dishes that come out of the round up! Since the first time I ate sushi I've loved wasabi - but I've never really used it in cooking. Krishna gave us a couple of vital wasabi hometruths:

Wasabi isn't horseradish!
I did know that one! Although... it is from the same family (the Brassicaceae if you're interested) and is often called Japanese horseradish!

And not only isn't wasabi horseradish - often it isn't even wasabi!! The worst of the pretenders (supermarket tubes!) is no more than a mix of horseradish+mustard+food colouring - and even the restaurants generally cheat away from the real thing.
Nice! I did not know that!! Apparently it's because wasabi loses its potency very quickly - so horseradish is added to give the 'nasal burn'... And true enough - I check my wasabi powder - only 10% real!!

I have another wasabi fact to add to the mix:

Wasabi is neturalised by ginger.
Yep, so you can get a huge lump of it, mix it in with your sushi and soy and feel your brains explode for as many seconds as you can bare... Through streaming eyes, find a few slices of pickled ginger and ease them past your burning lips. Chew, relax and feel the wave of ginger juice calm the burn!

So the next time you're eating sushi - don't add the ginger to the sushi 'bundle', but use it as a palette cleanser between pieces!

Anyway, with this month's offering I couldn't resist a return to my deep fryer. Beef marinated in ginger, mirin and soy, with a crunchy wasabi coating. Served with crispy ginger slices to protect against the wasabi! (Not that it was needed - I think next time I'd probably double the wasabi powder used... But I do like my food hot, so let personal taste drive your choice on this one!)

This made a great appetiser - but would also work well as a light lunch with a salad!

Wasabi Fried Beef with Ginger Crisps


  • 4 tbsp corn flour
  • 1 tbsp plain flour
  • 1 tbsp wasabi powder
  • 200g thick beef steak
  • 3 tbsp soy sauce
  • 3 tbsp mirin
  • 1 tsp toasted sesame oil
  • 2 tbsp finely grated fresh ginger
  • 1" fresh root - very finely sliced
Mix the marinade...
In a bowl big enough to take the steak, mix together the mirin, soy, sesame oil and ginger

Prepare the steak...
Slice the steak against the grain into slices about 5mm each. Add the beef slices to the marinade, cover and refrigerate for at least an hour.

Lovely steak!

In a food bag, mix together the two flours and the wasabi powder. Once the steak has marinated, strain the beef to remove the excess marinade (I was happy leaving the grated ginger in the meat - feel free to get rid of it if you want :)

Put the strained beef strips into the bag and mix thoroughly so that the meat is completely covered with the flour wasabi mix. Shake off the excess and leave the beef to sit for 10-15 minutes to allow the flours to bind with the marinade.

Heat the Oil...
Eeek! I don't have a real deep fryer, or a thermometer... so I can't give you an exact temperature. You want it really pretty hot though - ideally we are just crisping up the corn flour mix - not cooking the beef through!

Make the Ginger Crisps...
Carefully drop the ginger slices into the hot oil. Watch for them to turn golden, stirring occasionally. Remove from the oil and set onto some kitchen roll to drain.

Fry up the Beef...
Cook the beef in two batches to ensure there is enough space for it. Gently drop the beef into the hot oil, stirring immediately to separate the slices. Cook for 30-40 seconds - until the flour is crispy, remove from the heat and drain on kitchen roll. Give the oil a minute to come back up to heat before going the second batch. Don't over cook these - as they will continue to colour when drained... But if you *really* hate pink meat then give them up to a minute to ensure brownness!

Serve!
Serve with the ginger crisps scattered on top. I didn't feel that they needed dipping sauce, but if you really want to then keep it simple - there are already a lot of strong flavours going on in there!