Thursday 31 July 2008

RFJ: Seafood, Sesame and Cilantro - A Trilogy!

I think I may have mentioned in an earlier post, my weird obsessiveness around the number three...

My alarm goes off at 07:09... or occasionally 06:57. I'm eternally greatful that our time system is base 60... cook for 30 seconds, 15 minutes, 45 seconds, lovely... I even make friends' coffee with three 2/3 teaspoons of coffee instead of just 2!

Now... are you still there? I'm not that weird, honest - it's just one of my little quirks ;) I can skip it if I need to... I'd just rather not!

It's not just me - Chinese people consider the number three to be lucky because it sounds like the word 'alive'. And in many other cultures, it is considered a significant number due to the trinity of mind, body and soul.

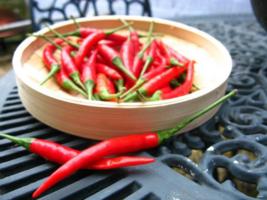
So anyway, I love that the Royal Foodie Joust has three ingredients, and this month I decided to propogate the three-love by using the three ingredients to make three fingerfoods and three dipping sauces!

The three ingredients were selected this month by Peter of Kalofagas fame, who won last month's joust with this amazing Apricot and Pistachio Cake. He chose Seafood, Sesame and Cilantro/Coriander - as soon as I read the list I knew I was going to have fun with this one!


Seafood, Sesame and Cilantro - A trilogy!

The first of the three is seared marinated tuna (in the middle!), coated with crushed coriander, szechuan pepper corns and sesame seeds. I served this with a thick tahini dressing, complete with a garlicky cilantro swirl.

Secondly, for your delectation, I present sesame-crusted squid (on the right!) with a cilantro and chili yoghurt dipping sauce.

Last, but by no means least - crispy fried wontons (on the left!) with a spicy fish and prawn mousse filling, served with sweet cilantro chili dipping sauce.

I had so much fun thinking up and making these dishes - I hope you like them!
If you like what I've done here, then head on over to the Joust forum and give me a vote ;) But even if you don't, get yourself over there to see the amazing dishes other people have created!

Seared Coriander And Sesame Crusted Tuna
  • 4 tbsp soy sauce
  • 2 tbsp rice wine
  • 1 tbsp mirin
  • 1/2 tsp sesame oil
  • 1 tsp grated ginger
  • 1 crushed garlic clove
  • 3 tbsp sesame seeds, lightly toasted
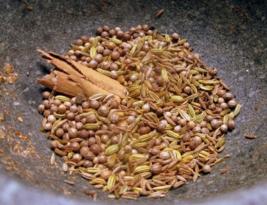
  • 3 tbsp coriander seeds
  • 1 tbsp szechaun pepper corns
  • 2 thick tuna steaks
  • ground nut oil for searing
  • 1/3 cup sesame seeds (for the tahini)
  • Extra virgin olive oil
  • Large handful cilantro
  • 2 clove garlic, crushed
  • 1 tsp rice wine
  • salt and pepper to taste
  • Zest and juice of half a lemon
Marinate the Tuna...
Mix together the sesame oil, soy, rice wine and mirin with the garlic and ginger.

Cut each tuna steak into long thick strips (give 'em three, four sides or more - your call!) and add to the marinade. Coat well and refrigerate for 30-60 minutes.

Make the Tahini Sauce...
Take the third of a cup of sesame seeds and toast in a dry pan for 3/4 minutes - being sure to keep them moving and not over-colour.

Once cooled, place them in a mini-blender and blend until smooth. Slowly add the EV olive oil until the sauce is still really thick but not like glue!

Add the lemon juice, 1 tsp rice wine, 1 clove of garlic and salt and pepper to taste. Blend again - it should now be a pourable texture (if not add a little water to loosen).

Make the Cilantro Swirl...
In the mini-blender (time-saving secret - I didn't bother washing mine from the tahini ;) place the cilantro, garlic and lemon zest and blend til smooth. Add olive oil until it reaches a pourable consistency.

Put the Sauce Together...
Put the tahini sauce into the serving dish, then add a dollop of blended cilantro. Attempt some swirly things... probably twice... (I had hoped this was going to come out more 'cheffy' than this - but it wasn't to be! ;)

Cook the Tuna...
Once the tuna has finished marinating, remove it from the fridge.

Pound the coriander seeds and szechuan together until coarsely ground. Place this mixture onto one plate - and the toasted sesame seeds onto another.

Remove the tuna from the marinade and coat each length in either the sesame seeds or the spice mix.

Heat a little oil in a very hot pan, and sear the tuna for no more than a minute on each side - the centre should still be very pink!

Serve!
Slice the tuna and arrange on serving dish with the tahini cilantro dipping sauce.


Sesame Squid With Cilantro Yoghurt Dip
  • 1 medium squid, cleaned
  • oil for deep frying
  • 1 cup milk
  • 3 tbsp sesame seeds, toasted and cooled
  • 4 tbsp cornflour
  • 1 tbsp plain flour
  • 1 tsp ground coriander
  • 1 large handful cilantro
  • 1 green chili
  • 3/4 cup natural yogurt
  • 2/3 drops of sesame oil
  • lemon juice, sugar, salt and pepper to taste

Prepare the Squid...
Cut the squid into strips and gently criss cross the inside to create a hatch pattern.

Place into the milk and refrigerate for 2 hours.

Mix the corn flour, flour and sesame seeds together in a food bag.

Once the squid has soaked, remove from the milk, shaking off the excess, then place in the bag. Shake bag thoroughly until the squid is well coated.

Remove the squid from the bag and place back in the fridge for at least half an hour - this is what makes the batter so crunchy!
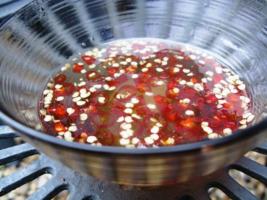
Make the Sauce...
In a mixer, blend the cilantro and the chili together until fairly smooth. Turn out to a bowl and add the coriander and the yoghurt. Mix well, then add lemon juice, sugar, salt and pepper to taste.

Refrigerate until required.


Cook the Squid...

Heat the oil until a cube of bread browns in 30 seconds.

Gently drop the squid in - shaking to separate, and being sure not to overcrowd the pan.

Cook for approximately 45 seconds, then remove and drain on some kitchen paper.

Serve with the chili cilantro dipping sauce, and enjoy!


Spicy Seafood Wontons with Sesame Chili Dressing

  • 300g white fish (I used cod!)
  • 100g prawns
  • 1 tsp sesame oil
  • 12 wonton wrappers
  • 2" piece ginger, finely chopped or grated
  • 2 cloves of garlic, crushed
  • 2 tsp fish sauce
  • Zest of 1 lime
  • 2 thai red chillies, finely chopped
  • 2 egg whites
  • 50 ml rice vinegar
  • 50 ml water
  • 75g sugar
  • 1 tsp cornflour
  • 1 tsp sesame seeds, lightly toasted
  • Soy sauce to taste


This made way more fish mousse than required - but can be used for great leftovers!

Prepare the Fish Mousse...
In a food processor, blitz the white fish until pretty smooth. Add one egg white, one chili, half the ginger, half the garlic, the lime zest, sesame oil and half the fish sauce and blitz again until it becomes 'spongey'.

Roughly chop the prawns and mix into the fish mixture with a spoon or your fingers. (Don't blend this time - we want the prawns to remain fairly intact!)

Prepare the Sauce...
In a mini-blender, blend the other half of the ginger, the other half of the garlic, one chili and a handful of cilantro until finely chopped but not totally pureed.

In a small pan, bring the rice vinegar/ water and sugar to the boil and simmer for 10 minutes. Mix the cornflour with a spot of water then add to the syrup, with the ginger/garlic mix and a couple of drops of sesame oil. Simmer for another minute or so and remove from the heat.

Prepare The Wontons...
Whisk together one egg white with a little water.

Place a wonton wrapper on a lightly floured surface and brush with the egg white mixture. Place a small teaspoon of filling in the middle and fold over, gently squeezing out all the air and pressing the edges together. Make into a shape if you want - I just kinda folded the long corners in and stuck them togther... I had a crazy idea about pan-frying the seam with a sesame seed mix. Which didn't work out - more on that in a sec!

Place in a steamer (make sure they aren't touching!!)

Cook the Wontons...
Once they are all prepared, steam for 4-5 minutes, then remove from the heat...

... right, so it was at his point that things started to go wrong... some of my wontons were touching - and when I tried to separate them the wrapper tore...

Emergency re-think required. My original thought had been to coat two side of the wonton in sesame seeds and pan-fry for a minute or two to give a lovely crunchy edge. But that wasn't going to work with my poor little torn wontons... So, noticing that my oil was nicely hot I decided to briefly deep-fry them instead!

Woo hoo - they were delicious! Make sure the oil is really nice and hot - these have already been cooked, we're just crisping them up. Fry for a minute or two then drain on kitchen paper.

Beware - they are still sticky little buggers, don't do too many at once - and keep them moving!

Serve!
With a squeeze of lime juice and sweet chili and cilantro sauce!

Wednesday 30 July 2008

T&T: What's For Lunch, Honey? Zucchine and Lemon Spaghetti, that's what!

As you may have guessed from the title, this is my contribution to the monthly Tried and Tested event from Zlamushka's Spicy Kitchen. The event showcases a different blog every month, and invites participants to create and blog one or more dishes from that blog.

The first time I took part was for Tastes Like Home - a blog that was new to me (though very familiar now!). This time, the nominated blog is What's for Lunch, Honey? - one of the very first blogs I ever subscribed to!

It was so hard to choose what to make - in the end I narrowed it down to gnocchi with garlic sage butter (I have tried to make gnocchi several times... but consistently failed. They either come out as bullets... or weird clouds of soggy mashed potato... nice!!) or veal vilanese - a kind of veal schnitzel with parmesan, yum!

But I had only tonight left to make and blog my dish - and after spending all last night madly preparing for the Royal Foodie Joust, I really need a more relaxed dinner tonight! Which - after my problematic previous endeavours - puts gnocchi out of the picture! And then I couldn't get a hold of veal!

In the end, this turned out to be a blessing in disguise... I went back to the archives and found this gorgeous summer pasta dish...

Spaghetti with Courgettes (Zucchini!) and Lemon!

Courgettes are plentiful right now, and I had lemons in the fridge! I followed the recipe almost exactly as written - though I used half green and half yellow courgette. and my sage in my herb garden has gone!!! I have no idea where. Come to think of it, I haven't seen it for a while - I think it might have been swamped by the rosemary and oregano! So instead, I substituted greek oregano - which I think worked very nicely. I will be making this again - and I'll replant my sage first!

Find Meeta's orginal recipe here! Thanks for a great recipe Meeta!

Monday 28 July 2008

Scottish Scran 1 - Square Sausage

Well - as it says on the profile, I'm a Scots lass living in England... and being the experimental type I have cooked many different cuisines over the years. However, one nation that I just haven't made much of an effort with is my own!

So I am starting a new challenge - to blog something Scottish every week or two, to prove it isn't all about deep-fried mars bars, pizza crunch and heart disease...

This will be a learning experience for me - I don't know nearly as much about Scotland's cuisine as I should - but I am looking forward to finding out!

The first recipe on my list is my favourite ever Scottish foodstuff... square sausage, sliced sausage or lorne sausage - depending on where you're from. A slice on square (a slice of plain Scottish bread, with a slice of square sausage, and a daub of broon sauce) is the ultimate morning-after breakfast, and something I look forward to (almost!) as much as seeing my family at Christmas!


Right, so I couldn't get Scottish plain bread, but ciabatta - with its chewy texture and savoury taste makes a decent alternative!

It's an easy recipe - mixture of ground beef and pork, mixed with breadcrumbs and spices, cut into a handy square shape, just right for putting on a roll. It also forms the basis of my family's own version of stovies - recipe to follow!

Square Sausage

Sliced and Ready for Storage
  • 2 lbs minced beef - not too lean!
  • 2 lbs minced pork
  • 1 tsp onion salt
  • 2 tsp pepper, freshly ground
  • 2 tsp nutmeg, freshly grated
  • 4 tsp coriander berries, toasted and ground
  • 2 tsp salt
  • 3 cups bread crumbs
  • Water as required
Right... I thought about doing this in my mixer... but there was just too much of it!! So - wash your hands really well, roll your sleeves up to the elbow, and be prepared to get stuck right in...

Mix the breadcrumbs with the spices and salt. Then using your hands, combine the two meats reasonably well. Mix both the breadcrumb mix and and the meat together and combine really well. If the mixture is too dry add a little water - no more than a cup though.


Now you want to pack it into the container that will shape your final 'sausage'. I used a weighing tray - measuring about 25cm * 18cm * 8cm. I lined it with clingfilm first to make it easier to remove, then packed the mixture into it as much as I could. There was some of the mixture left over - I'll tell you what I did with that later!

Cover the mixture tightly, put a weight on top, and put into the freezer for at least an hour - no more than 2! To weight it I used a hardback book, with a

Remove from the freezer and turn out from the container. Cut the block in half lengthways, then use a really sharp knife to cut slices. I don't think my breadcrumbs were fine enough - I think if they had been finer/dryer the slices would have stayed formed slightly better.

I decided to freeze my sausage in packs of four slices, separated by greaseproof paper, then wrapped in film - this makes it really easy to take some out.
Oooops - so maybe my slicing needs perfecting!

Ps. in case you were wondering about the title - scran is Scottish for food!

That I may be blest wi’ health, And scran.

Robert Wilson, Poems Chiefly in the Scottish Dialect (1824)

Friday 25 July 2008

Home-Corned Beef

Did you know there is no corn in corn beef?

Err.... durrrrr.... probably!

So do you know why they call it corn beef (or corned beef) then?

Hmmm...

Well I didn't until recently - apparently it is because it is cured with coarse salt - and the grains are also known as corns of salt.

So there you go!

Well, what is this stuff then??

Ah... this is what we folks in the UK call corn beef.... also known as bully beef outside of the UK. And it comes in a dangerous tin that you need a special key to open...

And we call American-style corn beef, salt beef!

Confused yet?! Well the German's apparently have two different varieties of tinned corn beef... And the Danish have yet another two types on top of that...

And don't even start me on pastrami (smoked, not boiled, if you're interested!)

Basically, what it all comes down to, is that corn beef is beef that has been cured with salt.

No corn involved!


So, the type of corned beef that I am making here is an American-style cure - I soaked the beef brisket in a spiced brine for 6 days, before gently simmering it for three and a half hours until the meat is meltingly tender.

I then chilled it before slicing and chunking.

To saltpeter, or not to saltpeter?
Corn beef cures traditionally contain saltpeter - a food preservative, which also gives the meat the traditional pink colour. Also known as
potassium nitrate, saltpeter is now thought to be carcinogenic - so I left it out. With modern refrigeration methods it isn't needed as a preservative - and it didn't seem worth the chemicals, just to make it pink! The flavour and texture are unaffected.

This recipe takes a bit of time to make - but not much actualy work is involved. So if you have a spare space in your fridge, give it a go. Adjust the spices used in the brine to your own taste - want it hot? Add more dried chilli. Hate garlic? Leave it out!

Recipes using my corned beef to follow!


Home-Corned Beef


Makes a lot of corned beef!!
  • 3 kilo beef brisket
  • approx 8 cups of filtered water
  • 1 cup maldon sea salt - I wouldn't use cheap salt here - that's what's going to be flavouring your meat!!
  • 1 cup sugar
  • 3 cloves garlic, crushed
  • 1 tsp black mustard seeds
  • 1 tsp juniper berries
  • 1 tbsp mixed whole pickling spices (allspice berries, dried chili, black peppercorns, bay leaves)
Prepare the Brine...
I prepared my brine in the casserole dish I was using to soak it. (I tried to buy a zip lock bag to use, but couldn't find one big enough!)

Bring half of the water to the boil and add the salt and sugar to it. Stir until dissolved (bring back to the boil if required).

Add the other spices to the mix, the remaining water and allow to cool. (I put some reusable ice cubes in to make it cool down more quickly without diluting! I guess if you add less water you could put in real ice cubes... or be patient and wait for it to cool down naturally!)

Add the Beef...
Trim any excess fat from the beef joint, and gently place into the cooled brine.

Use a non-metallic weight to ensure the joint is fully submerged - add more water if necessary.

Just after immersion!

Wait...
Store in the refridgerator for 6 to 10 days, turning the joint daily. I'm not sure how you're supposed to know when it's ready to take out (I'm writing this at day 2), but I'll let you know!

Wait...
Wait...

Whilst you're waiting, here's a pretty pic of a pre-sunset from my living room window!

And back to the waiting...
Wait...
Ok... And I'm back!

I waiting 6 days in the end - and I'm still not sure if that was too little/ too much or just enough!

But the joint felt firm to the touch all over, and had turned a pale pink colour. Does that mean anything?!??

Prepare for the Cooking...
Anyway, on the 7th day, I removed the meat and discarded the brine. I then rinsed it thoroughly under cold water, before placing it in a large saucepan along with one roughly chopped onion, 6 peppercorns, 3 juniper berries and a couple of bay leaves.

Cook!
Top up the pot with water until the meat is covered, then bring to the boil. One boiled, cover and turn to the lowest heat possible and gently simmer for 3-4 hours (depending on the thickness of your meat.
I reserved the stock that the beef was cooked it - it had a gorgeous deep spicy flavour, yum!

Once cooked, remove to a dish, loosely cover and leave to cool.* Once cold, put in the fridge for at least a couple of hours - you want it really cold before you try to slice it.

Using a really sharp knife, cut the corned beef into thin slices for sandwiches - and into chunks if you want to use it in hash/soup etc.


* I was going to have some of it hot, but in the end, decided to save it all for future use!

Wednesday 23 July 2008

Saffron-Infused Lemon Sole with Lemony Samphire Rice

My third fish dish in a row - I love summer!

This was yet another home coming dish - I was away at a festival all weekend... and definitely in need of a healthy home-cooked dish on my return. After a bath that is - after 4 days in a field that was my top priority!

The festie was amazing - so much better than last year, when we got totally flooded out!! Want to see a pic of my tent last year??

Hmmm... see that puddle on the tent?? Well that's where my head was supposed to be...

At that point we decided to cut our losses and head home. But after hiking 3/4 of a mile through the mud and driving rain to the exit, we were told we couldn't leave... the roads for 10 miles around were flooded to waist-height. It wasn't one of the happier moments in my life!

We got back to the campsite... which by then looked like this...

(That's flowing water by the way!!)

But - spirit of the blitz and all - we stuck it out and had a good time anyway - the sun eventually came out - though the mud was there to stay!!!

What a mission!!!

Anyway, after my little detour, I'll get back to the food blogging! (My pics from this year are still stuck on my phone!)

I think that the festival was my last big occasion of the summer so I hope to get back onto more regular blogging from now on in (barely a post a week in July - shocking!! ;)

As this dish is all my own (as most of them are!!) I'm submitting this dish to Lore over at Culinarty - for the Original Recipe event. This is a great way for people to find brand new recipe - as well as showcase what they have created.

Generally when I create a new recipe, I start with one key ingredient, or idea, then build it up from here. This time I had picked up some gorgeous lemon sole from my fishmonger, and whilst I was there got some samphire for the first time this year. I only tried samphire for the first time last year - it is a great ingredient. Sometime known as the asparagus of the sea, it has a lovely crunch, and a fresh 'sea' taste which really supplements fish dishes. If it is new season, try it raw in salads (give it a good wash first!), or quickly stir fry it with a bit of chilli and garlic. I had been planning to cook potatoes to go with the fish - but I felt that lemons and tomatoes would work really well with the samphire - so brown rice just seemed to match.

And the saffron infusion - well, just because I could!


Saffron-Infused Lemon Sole with Lemony Samphire Rice

Serves 2
  • 2 fillets lemon sole
  • Good pinch saffron
  • 1/4 tsp turmeric
  • 150ml milk
  • 6 peppercorns
  • 1 bay leaf (preferably fresh)
  • 150g new season samphire
  • 2 tbsp tomato puree
  • 1 cup brown rice
  • 600ml fish stock and/or water (I only had 400ml stock, so topped up with water)
  • salt & pepper to taste
  • 4 large tomatoes - reserve the vine if it has one!
  • Zest and juice of 1 lemon
  • 1 chilli
  • 1 banana shallot, finely chopped
  • 1 clove garlic, crushed
  • handful parsley, roughly chopped
  • 1/2 cup plain flour for dredging
  • Olive oil
  • butter
Prepare the Veggies...
Wash the samphire in cold water and chop it into inch long pieces. Leave to soak for as long as possible - this will stop it being too salty. Bring a pot of water to the boil (don't add salt!) then blanch for a minute or two. Drain and refresh in iced water. Set aside.

Half, then quarter the tomatoes. Remove and discard the seeds, and dice the flesh into 1cm cubes - leaving the skin on. Cover and refridgerate until needed.

Heat a glug of olice oil in a frying pan and gently fry the shallot, garlic and 1/4 of the lemon zest for 3/4 minutes. Add a couple of tablespoons of fish stock and the juice of half a lemon, then fry until reduced to almost nothing. Set aside.

Make The Saffron Infusion...
Heat 150ml of milk in a pan just big enough to hold the fish. Once boiled remove from the heat and add the bay leaf, peppercorns, turmeric and saffron. Mix well and set aside to cool thoroughly.

Once cooled, add the sole fillet, skin-side up - top up with more milk if required. Cover and refrigerate for at least half an hour. (But no more than an hour)

Prepare the Rice...
Wash the rice in several changes of cold water - leave to soak for a while if you have time. Place the rice, tomato puree and water/stock into a large saucepan and bring to the boil. Piece the chilli several times and add to the pot, along with half of the lemon zest. If you reserved the tomato vine, give it a wash and add too - it's amazing the amount of flavour that is held there. (A Heston Blumenthal tip!)

Simmer until the rice is cooked, probably about 30 mins depending on the rice.

Remove the vine and chilli, then add the diced tomatoes. Cook for another 2/3 minutes and turn off the heat. Add the samphire, parsley and onion mixture, mix well and season to taste.

Cook the fish...
Drain and discard the saffron milk from the fish. Season the flour with salt and pepper, then dredge the fish in it - being sure to pat off any excess.

Heat a good glug of olive oil to a medium heat in the pan you cooked the onions in, then gently lay the fish in, skin side down. Cook for 3 minutes, then turn. Add a couple of knobs of butter and cook for another minute or two, then turn off the heat - allowing the heat from the pan to finish the cooking for you.

Serve!
Place a couple of spoonfuls of the rice mixture in a bowl, and lay the fillet over it. If you like (I did!) pour the butter from the pan over the fish. Top with a wedge of lemon and a garnish of parsley.

Enjoy!


Culinarty: Original Recipes

Thursday 17 July 2008

TT&T2 - Catalan Fish Stew with Spelt Bread


Health concious? Me??


Well I do try... it's just the weekends that cause problems!!

Regular readers will hopefully know that most of my recipes are pretty healthy - I love my spice and don't eat too much dairy or red meat. I do obviously have the occasion exception to the rule... especially when I discovered deep fat frying... but on the whole I love making dishes that taste good without being full of 'rubbish'.

So Tried, Tested and True 2 - an event conceived by Psychgrad and Giz from Equal Opportunity Kitchen - is right up my alley. This is their second event - check out the round up from the first one - what a fab collection of recipes!

This time however, there is a difference. Our tried and tested recipes have to promote health - be it low cal, low fat, high nutrient, whatever. They want don't just want dishes that work - they have to work for you too!

I decided to make a dish I have made a few times before - Catalan fish stew. It is a great dinner party dish as the bulk of the work can be done in advance. It is based jointly on a dish I had whilst in Barcelona and a Catalan fish stew I saw on MasterChef a year or two later - white fish, fried in olive oil, topped with a tomato, pinto beans and chorizo sauce. Flavoured with both fresh and ground fennel and thickened with ground almonds, this is a super tasty dinner - despite being healthy!!!

Right... so... you want to know what makes this so healthy?

Tomato Based Sauce!
Tomatoes are the best food source of uber-protective antioxidant nutrient, lycopene - which has amazing cancer and heart disease prevention properties.

Check this out - men who eat tomatoes twice a week are on average 35% less likely to get prostate cancer. Tomatoes also help protect against breast, pancreatic and intestinal cancers.

Tomatoes are an excellent source of vitamin C, vitamin A, and vitamin K (for bone health) and are a very good source of fibre and calcium too.

And... cooking tomatoes actually improves their health benefits as it concentrates the phytonutrients.

Pinto Beans!
Eating pinto beans will lower your cholesterol levels due to their high fibre content. They are also an excellent source of protein and vitamin B1

If you suffer from unstable blood-sugar levels (like me!), eating pinto beans will level out the highs and lows - with slow release energy thrown in to boot!

Pinto beans high levels of phosphorus, iron, magnesium, potassium, and copper lowers heart attack risk, heart disease risk and blood pressure.

Almonds!
Hmmm... Almonds? Really?? But they're sooo fatty...

Ah HAH - but they're the good type of fat! Y'know the type of fat that makes us lose weight, reduces the risk of heart disease and lowers cholesterol... monounsaturated fat!

Eating almonds can significantly reduce the GI level of what you're eating too, and contain more protein by weight than an egg!

Cod!
As well as tasting fab, cod is an amazing low-calorie source of protein - rich in omega-3 fatty acids. Though it really doesn't sound good - food rich in omega-3 fatty acids can help control blood pressure, protect against cancer and can even protect against Alzheimer's and Age-related Cognitive Decline.

Spelt!
What previously may have made this dish less healthy was that I generally serve it with huge hunks of chewy white bread... So in the spirit of the event I decided to make my own spelt bread to eat with the stew.

Spelt is higher in complex carbs that wheat - as well as containing way more fibre and protein. Many people also find they can tolerate it more easily than wheat - though it is still not gluten-free.

The bread had a lovely deep nutty flavour, and was very quick and easy to make - recipe at the bottom!

Low in Fat...
Ok, ok, so the fish is fried...

But it is in healthy olive oil... and get this: the phytonutrients in tomatoes will be far better absorbed when eaten with a little oil. So you see, I was thinking about you all the time!

So, now I've dispensed with my healthful rhetoric... let's get back to the dish, I hereby present you with my incredibly healthy, incredibly tasty...

Catalan Fish Stew

Served 7 hungry people!

  • 1500g cod fillet - skinned (any firm white fish will do!)
  • 500g huss fillet - skinned (again, any firm white fish will do!)
  • 500g mussels, prawns and/or squid cooked and peeled if required
  • 200g chorizo, diced
  • 1 tin pinto beans, drained and rinsed
  • 1 tin chopped tomatoes
  • 4 large tomatoes, diced
  • 1 large onion, chopped
  • 1 fennel bulb, chopped
  • 3 cloves garlic, crushed
  • 1 red chilli, finely chopped
  • 1 tsp fennel seeds, ground
  • 2 tbsp paprika
  • 1 tbsp oregano (fresh only, don't use dried)
  • 1/2 tsp saffron strands
  • 3 bay leaves
  • 1 cup water
  • A large glass of white wine (I don't measure wine in cups ;)
  • 1 cup ground almonds
  • olive oil for frying
  • 3/4 cup white flour for dredging the fish
  • salt to taste
Prepare the Sauce...
As I was cooking this for a mid-week dinner I decided to prepare the sauce in advance to give myself as little to do as possible the next day.

Heat the olive oil on a medium heat, and fry the onions, chorizo and garlic for 4/5 minutes. Add the ground fennel, oregano, 1 tbsp of paprika, the bay leaves and tomatoes and simmer for about 15 minutes.

Add the water and white wine, allow to cool and refrigerate until required. Or you could leave it to simmer away whilst you fry up the fish if you're doing it all on the same day! (Which is probably more likely ;)

Fry the Fish...
(If you did prepare the sauce the night before then bring it to a simmer now!)

Chop the fish into large pieces. Mix the flour with a tablespoon of paprika and season with salt.

Dredge the fish in the flour mixture - patting off as much excess as possible.

Heat olive oil to a medium heat and fry the fish for a couple of minutes on either side - or until just cooked through - this will depend on how thick your fish is!

Set aside.

Put it Together...
Add the pinto beans to the sauce and simmer for 5 minutes. Taste and adjust seasoning if required. Add the almonds, mussels, squid and prawns and cook for two minutes further.

Divide up the fried fish between the plates and spoon over the seafood sauce.

Serve with hunks of bread for mopping up the juices... for instance, my

Single Rise Spelt Bread!

Makes 2 2lb loaves


  • 6 cups wholemeal Spelt flour
  • 2 cups hand-warm water
  • 1 tbsp dried yeast
  • 2 tsp salt
  • 3 tbsp honey
  • 2 tbsp olive oil
  • Toasted sesame seeds to sprinkle
Activate the Yeast...
Dissolve the honey and yeast with one cup of the warm water. Cover and leave for 10 minutes until it starts to foam.

If it hasn't started to foam after this time, try again - the water may have been too hot or too cold. If this doesn't fix it may well be that your yeast is too old and needs to be replaced.

Prepare the Dough...
Add one cup of flour to the dough and mix well, then add the salt and the flour, cup by cup until it is all incorporated.

Turn out the dough and knead for 3 minutes - do not overwork the dough. The dough should be soft but not sticky.

Lightly grease 2 2lf loaf tins*. Divide the mixture in two, shape into loaf sausages and place in the tins. Cover in oiled clingfilm and put in a warm place to rise until doubled.

Spelt can be really fast rising - so start checking after about 45 minutes. In my case it took over an hour though.

Bake!
Preheat oven to 180c.
Lightly brush the tops of the loaves with milk and sprinkle with the toasted sesame seeds.

Pop in the oven and bake for 45 minutes, or until golden brown and sounds hollow when tapped on the bottom. Smells good? We're almost there!

Remove from the tin and put back in the oven for 5 minutes to crisp.

Place on a wire rack and allow to cool for at least 30 minutes before eating.

As well as an accompaniment to the fish stew - this made the most amazing sandwich bread - full of flavour!


* This is what I would have done if I'd had two loaf tins... I only had one - so I wrapped half of the dough in greased film and refrigerated it whilst the first loaf was rising - then let the second rise while the first was baking!)


Thursday 10 July 2008

Psari Plaki - or Mary Queen of Cods!

When Peter the Greek of Kalafogas fame posted this beautiful baked fish dish last week I dribbled and drooled, stumbled and tagged as I so frequently do - and it entered the voluminous bank of 'recipes to make' that I have been cultivating for the last year or two.

But the next day when I went to pick up a piece of fish for a healthy post-Ibiza dinner, it popped back into my mind - so instead of the skate wings I picked up a beautiful whole cod instead! (I love my fishmonger - check out this 3lb beauty - for less than a fiver!!)


So Peter's dish is Ψάρι πλακί (did I pronounce that right Peter?? ;) or Psari Plaki - basically fish baked with tomatoes and olive oil (some sites say tomatoes and potatoes, others tomatoes with herbs or various veggies - but tomatoes are the constant.) Baked in the oven, and served with a load of crusty bread for mopping up the juices, how could I resist!?

So I trudged home with my huge cod (after making some phonecalls to ensure I'd have company to eat with!) and visited the bakers and greengrocers for the rest of my ingredients.

Peter's recipe specifies Cubanelle peppers. Now I wasn't too sure what those were, but he pointed me towards any sweet, thin-skinned pepper - the flavour of the dish would be overwhelmed by using bell peppers here.


The guy in the shop didn't know what these peppers were called, but they were thin-skinned and sweet - and worked perfectly!

Peter also recommended using old floury potatoes - not waxy or new. But decent old potatoes are not the easiest thing to find in England in July. So instead I reverted to one of my old favourites - Cyprus potatoes. A hint of waxiness, though not too much so, I thought these worked really well. They were creamy and smooth, and just falling apart enough to give some real body to the sauce.

But, anyway, back to the tale!

I got myself home and started laying out the kitchen, and quickly realised something. A 3lb fish is really, really big. Way too big to fit in any of my oven dishes.

There was only one thing to be done...

CRACK, HACK, SNIP

A hack, snip and a crack later, and we have it - behold Mary, Queen of Cods!

I'm not going to go into the detail of how I prepared the plaki - I followed Peter's recipe - and a lovely simple one it was too. I used fresh oregano from my garden, and I think I may have thrown in an extra tomato. Because it goes against my nature to do exactly what I'm told!


So anyway, the tatties and veg were layered in, the headless fish snuggled down amongst them, and the paprika olive oil slurry poured on top. I was about to put it in the oven... when I noticed Mary gazing forlornly from the counter with her one visible eye. There seemed to be such a lot of flavour going to waste in that beautful big fishy head.

The cats were at my feet looking hopeful. But I had plans to reunite Mary to her body...

Yeah, that'll do it!

I've no idea whether that added anything to the flavour - but it amused me so she stayed.

So (bear with me - I'm almost done) fifty minutes later, out she came from the oven. The smell was fabulous!

For me, the hardest bit of the whole thing was the carving (do you still call it carving for a fish?!) Lifted the fish out of the dish was a challenge. Then trying to remove skin and bones without destroying the fish?? Difficult to say the least! Half of my plates had skin-on fillets - the other half had skinless cod flakes. It was all polished off in record time though - with mountains of softly chewy white bread with a crisp, light crust. Absolutely beautiful, thank you for a fabulous recipe Peter. I do believe I'm going to start a new tag: 'recipes to make... again'!


Psari Plaki-ttie


I'm sending this over to Ruth for her weekly Bookmarked Recipes event. It's my first entry!

Tuesday 8 July 2008

Watercress and Rocket Blue Cheese Pesto

'Pesto' basically means to pound or crush. And traditionally pesto is made by pounding herbs and garlic with a mortar and pestle. But pounding makes me tired, hot and grumpy, so I revert to my old faithful - Mr Kenwood! End result? Gorgeous pesto in 5 minutes!

Typically, the pesto most people know and love is Pesto alla genovese - basil, garlic, olive oil, pinenuts and a hard cheese. My version uses rocket, watercress and creamy blue cheese... really quite different - and I loved it! One of the reasons I don't make pesto too often is because it costs a fortune to buy that much basil here (yes, I have tried to grow it - plants always commits suicide within weeks in my keeping... ;) But I will definitely use this as a way to use up excess herbacious leaves - they usually end up in the bin!

Now I know some people like their pesto chunky - but my personal preference is a full blitzing. If you'd prefer more texture to your pesto, put all the ingredients in at once and blend to desired bittiness!

I'm sending this over to Gay at a Scientist in the Kitchen, who is hosting Presto Pasta Night this week for Ruth at Once Upon a Feast!

Watercress and Rocket Blue Cheese Pesto


Excuse the dark piccy - I took this to a friend's house for dinner, and forgot my camera, so this is a phone camera shot!!
  • 150g watercress/ rocket, washed
  • 2 cloves garlic, crushed
  • 1 small handful pinenuts
  • 3 tbsp blue cheese
  • extra virgin olive oil
  • salt and pepper to taste

Prepare the Pinenuts...
Roast your pinenuts in a hot dry pan for a minute or two - for an extra bit of depth!

Make the Pesto...
Put the garlic and pinenuts into your processors and blend until fairly smooth. Add the watercress and rocket and continue to whizz until the leaves are finely chopped. Incorporate the cheese - as it blends drizzle in olive oil until you reach your desired consistency.

Taste and adjust seasoning.

Serve!
I used mine to make blue cheese spaghetti with asparagus - cook the pasta according to instructions, chucking in the aspargus for the last minute or two of cooking. (Yes, steaming it would be better - but this way is so much easier... less pans to clean too ;) Strain out the aspargus and chop into bite size lengths. Drain the pasta, reserving some of the cooking liquor. Add the pesto to the pasta (I used half of the above portion to feed 4), top with the asparagus and crumble over more of the blue cheese. A sprinkle of roasted pine nuts on the top - and you're ready to slurp!

Wednesday 2 July 2008

I'm back! Onion and Fenugreek Pakora Anyone??

Well, hello, hi and howdy doody!!!

This is my first post in an absolute age. First of all I was on holiday in Ibiza for a week... and what a week it was! Have a pic of me swimming at sunrise! It was just beautiful.


Sunrise Swimming in Ibiza!

What wasn't so great was getting sunstroke on the last day (durr - how annoying/stupid was that, I'd had on loads of SPF, and drank plenty of water, but still got ill after 3 hours in the sun. It was HOT!). The upshot was I had to stay at home in bed while my friends went out for the big last night out. And what was even worse than that was that I still felt worse than they did the next day for the journey home - they could at least have had the decency to fake hangovers!!

For the rest of the time, I've been having massive issues with my internet at home - and been busy during the day so not even had much time for lunchtime blogging! I have been doing quite a bit in the kitchen - but because of my internet issues I've had to go to an old entry rather than any of the new exciting things I've been working on this week!

These pakora were the last thing I managed to deep fry before my oil finally gave out! Having this oil for deep frying has been a bit of an education since I first made the Guyanese Bakes - and I'm not sure my waistline has thanked me for it. I am very tempted to refill it immediately - primarily to make this szechaun squid again...

I have blogged pakora once before - though I got slightly snack happy... churning out huge Mushroom pakora, Courgette & Carrot pakora and Onion & Red Pepper pakora - as well as the 'typical' onion variety. We were eating them for days! This time round I made far far less, made each one a bit smaller, and quartered my onions instead of halving them so that they make smaller bundles. Bear in mind that the baking powder causes these to puff a bit - a heaped teaspoon of mixture will give a nice sized pakora... a tablespoon will make you a giant!!

Feel free to fidget about with the spices you use - I stuck to the basics here as I really wanted to emphasis the fenugreek - but make it as plain or as complex as you like!

Onion and Fenugreek Pakora

Makes about 15 pakora
  • 1 large onions, quartered then fairly thinly sliced
  • gram (chickpea) flour
  • 1/2 tsp baking powder
  • water to mix
  • 1 tsp black mustard seeds
  • 1 tsp chili powder
  • 1 tsp garam masala
  • 1/2 tsp dried fenugreek leaves
  • Large handful fresh fenugreek leaves, finely chopped
  • 1 tsp salt, or to taste
Heat the Oil...
As I'm frying these in a pot I don't have a proper temperature gauge - but the last time I made these in a deep fryer I cooked them at 175c.

Prepare the Onion Batter...
Put the onions in a large mixing bowl.

Mix the about 6 heaped tablespoons of flour, the baking powder and the spices together (including the dried fenugreek) and sprinkle over the onions.

Give it a good stir, them add a bit of water to make a fairly thick paste. You want the batter to be thick enough to cling to the onion, but not so thick that it clumps together too much (otherwise it will go stodgey in the middle). And if it's too thin the pakora won't stick together in the fat, and will separate into pieces... You might want to add another bit of flour, then another bit of water if you want more batter.

Tip!
Don't be tempted to make the batter in advance - the baking powder will be activated as soon as it is exposed to liquid. Make it just before use for best results!

Cook the Pakora...
Pick up teaspoonfuls of the mixture and slide into the hot oil. They will take 4/5 minutes to cook - turn them once or twice during cooking to ensure even colouring.

Serve!
Serve with a dipping sauce... or even better with two dipping sauces - one hot tomatoey and tangy sweet - the other creamy and cooling!