Monday, 20 October 2008

Fancy Mushrooms with Oak Smoked Garlic

This is a fast, simple recipe, which proves that with good quality ingredients little fussing is required*.

I picked up a load of mushrooms on a recent trip to Borough Market. There were loads of types, and I don't know most but they included ceps, autumn chanterelles, horn of plenty and oysters. They cost a forearm and an ankle (really must sign up to that foraging course next year...) and were supposed to be served for breakfast the next day. But a late night and a hangover made a bacon and egg sarnie the only breakfast option!

Later that day, once the hangover abated, I managed to sort myself out enough to prepare this simple supper: mushrooms with oak smoked garlic, served on bulgar wheat with a dash of lemon and a tickle of thyme.

Fancy Mushrooms with Oak Smoked Garlic

Serves 2
  • Various mushrooms, cleaned
  • 1 clove smoked garlic, crushed
  • 1 cup bulgar wheat
  • Vegetable stock
  • Half a lemon
  • Half tsp fresh thyme leaves
  • Extra Virgin Olive Oil
  • Salt and Pepper to taste
Place the bulgar wheat and thyme in a bowl and cover with vegetable stock. Cover bowl and leave for 10 minutes until all the liquid is absorbed. Fluff with a fork, add a good squeeze of lemon juice, adjust seasoning and fluff again.

Heat a little oil in a frying pan and add the mushrooms. Fry gently for 5 minutes until cooked through, adding the garlic and any seasoning for the last couple of minutes of cooking.

Place the bulgar wheat in a bowl, and top with the mushrooms. A garnish of lemon and you're set to go...


* I like fussing. And I like lots of flavours! I'm saying is it isn't necessary.It's kind of like that new pair of toweringly high shoes. Not required... but very, very nice!

Friday, 22 August 2008

More noodley goodness: Orange & Ginger Soba Noodles

I found this recipe a while back, on my first visit to the beautiful vegetarian Indian food blog, Saffron Trail. And despite never having tasted it, I got a real craving for it a couple of days ago!

It's basically a noodle dish with a nice bit of steamed veg... and a gorgeous orangey, gingery, peanut butter dressing! Yum. I mixed the dressing up, and I could have probably eaten the lot of it with a spoon! (Peanut butter soup!!) I think this dressing would go amazingly well as a dipping sauce for chicken too.

While the original recipe calls for smooth peanut butter, I only had crunchy at home. While I probably will try it with smooth when I get a chance, I really liked the extra texture that the crunchy peanut butter added.

This is a great dish, quick and relatively healthy. I made up a batch in the evening and had it for dinner, then took the leftovers to work the next day. You must do this!!! It was even better on day 2!

Anyway, happy Friday everyone! Long weekend for me due to a public holiday... to celebrate I'm heading up to Notting Hill Carnival! Cross your fingers for some sun!

Orange & Ginger Soba Noodles

Serves 4...
  • 3 tbsp crunchy peanut butter
  • 2 tbsp toasted sesame oil
  • 3 tbsp soy sauce
  • 1 tbsp grated ginger
  • Juice and zest of one orange
  • 1 tsp red chilli powder
  • 250g soba noodles
  • 6 Runner beans, cleaned and thinly sliced
  • 3 carrots, ribboned
Prepare the Dressing...
Whisk together all the ingredients except the noodles and veg - taste and adjust seasoning or acidity - I added a dash more orange juice and another dash of soy. Set aside.

Prepare the Noodles...
Cook noodles according to packet - probably 5/6 minutes. Drain and rinse under cold water.

Prepare the Veg...
We want these to be super lightly steamed - the crunch of the carrot ribbons go so well with the silky noodles! So maybe 3 minutes for the beans, and just a couple of minutes for the carrots.

Chuck it All Together!
If you want to eat this warm, heat the noodles by pouring boiling water over them. Mix together the veg and noodles; give the dressing a last whisk, then pour it over the top.

Mix through so that all the noodles are coated in the dressing.

If you fancy a faff, decorate with some raw carrot ribbons and orange segments. Or not!

Either way, tuck in, slurp it up, and wonder why you've never tasted gingery orange peanut butter before... Enjoy!


Another Friday trio!

This week I'm going to send this over to Ruth at Once Upon a Feast for Presto Pasta Night! Though I think I'm early - at time of writing the last round up hadn't even been posted!

Its near the end of the month, so a cheap dinner is even more appreciated than usual. And that's why I'm going to send this to Frugal Fridays! Even taking into account that I used posh organic soba... this would feed 4 for about £4 - or ~ $8!

And finally, this is my second submission to Ruth's Bookmarked Recipes event. Check out the round up on Monday!


Presto Pasta Nights Frugal Fridays

Sunday, 10 August 2008

That Cookbook Thing II: Rapee Morvandelle

It's time for another round of the Cookbook Review II! It's an event dedicated to exploring recipes from Julia Child's Mastering the Art of French Cooking.

The event by initiated by Mike of Mel's Diner, joined by Ruth of Once Upon A Feast, Sara of I Like to Cook, Breadchick Marye, Deborah of What's in My Kitchen?, Mary of Cooking for Five, Elle of New England Kitchen, Shaun of Winter Skies, Kitchen Aglow - and, of course, me!

Last time we recreated Julia Child's Sauce au Cari - a light creamy curry sauce - this time our mission was to make a Rapee Morvandelle - a gratin of potato, onions and ham.

As my mum was on her way down to visit with a vegetarian friend, I decided to substitute mushrooms for the ham - throwing in a bit of porcini too to make sure it had the depth of flavour. I made up the mushroom mix the night before, then put it all together when I got home from work.

When the weary travellers finally got in after 10 hours of travelling (flooded rail tracks in Scotland...) it was just about ready to come out the oven. A crisp green salad and some corn on the cob made this a perfect summer dish.

Rapee Morvandelle
(avec Porcini et les Champignons sans Jambon!)


Ok, so I have quite a few little variations on Julia's recipe - not least the substitution of mushrooms for ham. However, most of these were to do with proportions... Maybe my potatoes were large... or my eggs small - but I had to add an extra egg to give it all a good binding. And a touch more cream. (Though it ended up being a touch more milk - I accidentally knocked the tub of cream all over my cooker... doh!)

The original recipe called for half a clove of garlic. Half. Hmmm... I'm sure it's because modern tastebuds are so desensitised... but this just wasn't going to be enough for me (Plus, what kind of garlic? My local shop sells 4 kinds - of varying strengths and sizes!!) So I used 2, and it was by no means overpowering!

I used two types of cheeses - half gruyere and half emmental... ummmm.... I think next time I might grate some over the top as well. It didn't need it, but I hardly ever treat myself to creamy cheesey dinners, so I want to make the most of it! (I like Ruth's idea of sprinkling some paprika over the top too!)

I used fresh tarragon when preparing the mushrooms, and fresh flat-leaf parsley in the egg mix.

To grate the potatoes quickyl and easily (and stop them going grey!) I peeled them all first, then grated them in my food processor. A quick rinse of water before squeezing them in a tea towel and straight into the egg mix!


  • 100g grated cheese
  • 5 eggs
  • 5 tbsp single cream
  • 3 potatoes
  • 1 medium onion, finely chopped
  • 2 cloves of garlic, crushed
  • 300g chestnut mushrooms, chopped
  • small handful porcini, soaked in hot water for half an hour (reserve the water!)
  • 1 tsp chopped tarragon
  • 1 tbsp chopped flat-leaf parsley
  • butter
  • olive oil
  • salt and pepper to taste (i.e. much more that the original recipe!)
Preheat oven to 375f

Prepare the Mushrooms...
In a heavy based skillet, heat a knob of butter with a tbsp of olive oil. Add the onions and fry over a low heat for a couple of minutes. Now finely chop the porcini and add to the onions, cooking out for another couple of minutes before adding the chestnut mushies.

Now, when the chestnut mushrooms are almost cooked, they will start to release their juices. At this point, add half the garlic, seasoning and a couple of tablespoons of the porcini soaking liqueur.

Cook until the liquid is absorbed and set to one side.

Prepare the Egg Mixture...
Beat the eggs with the cream until smooth. Add the rest of the garlic, salt and pepper and beat again.

Gently fold in the mushroom mix, along with the cheese and parsley.

This is when you should grate your tatties - any earlier any you'll end up with a greytin... boom boom? Ok, so I'm not funny...

Mix the potato into the egg mix - this is where I had to add the extra egg as the potato was still too dry.

Cook!
Heat a knob of butter in the skillet. Once it is foaming, add the potato mix - spread to the edges.

Dot the top of the gratin with some more butter and put into the over for 30-40 minutes.

Take out, slice and enjoy!

I really enjoyed this cheesy, creamy goodness! And it went down well with my guests too. I'd like to try it with ham - although the mushrooms were really good with it.

I have just under half of it left in the fridge... I haven't tried it yet - but I'm guessing it's going to be delicious cold when I get home after cocktails with my mum tonight!!

Wednesday, 30 July 2008

T&T: What's For Lunch, Honey? Zucchine and Lemon Spaghetti, that's what!

As you may have guessed from the title, this is my contribution to the monthly Tried and Tested event from Zlamushka's Spicy Kitchen. The event showcases a different blog every month, and invites participants to create and blog one or more dishes from that blog.

The first time I took part was for Tastes Like Home - a blog that was new to me (though very familiar now!). This time, the nominated blog is What's for Lunch, Honey? - one of the very first blogs I ever subscribed to!

It was so hard to choose what to make - in the end I narrowed it down to gnocchi with garlic sage butter (I have tried to make gnocchi several times... but consistently failed. They either come out as bullets... or weird clouds of soggy mashed potato... nice!!) or veal vilanese - a kind of veal schnitzel with parmesan, yum!

But I had only tonight left to make and blog my dish - and after spending all last night madly preparing for the Royal Foodie Joust, I really need a more relaxed dinner tonight! Which - after my problematic previous endeavours - puts gnocchi out of the picture! And then I couldn't get a hold of veal!

In the end, this turned out to be a blessing in disguise... I went back to the archives and found this gorgeous summer pasta dish...

Spaghetti with Courgettes (Zucchini!) and Lemon!

Courgettes are plentiful right now, and I had lemons in the fridge! I followed the recipe almost exactly as written - though I used half green and half yellow courgette. and my sage in my herb garden has gone!!! I have no idea where. Come to think of it, I haven't seen it for a while - I think it might have been swamped by the rosemary and oregano! So instead, I substituted greek oregano - which I think worked very nicely. I will be making this again - and I'll replant my sage first!

Find Meeta's orginal recipe here! Thanks for a great recipe Meeta!

Wednesday, 2 July 2008

I'm back! Onion and Fenugreek Pakora Anyone??

Well, hello, hi and howdy doody!!!

This is my first post in an absolute age. First of all I was on holiday in Ibiza for a week... and what a week it was! Have a pic of me swimming at sunrise! It was just beautiful.


Sunrise Swimming in Ibiza!

What wasn't so great was getting sunstroke on the last day (durr - how annoying/stupid was that, I'd had on loads of SPF, and drank plenty of water, but still got ill after 3 hours in the sun. It was HOT!). The upshot was I had to stay at home in bed while my friends went out for the big last night out. And what was even worse than that was that I still felt worse than they did the next day for the journey home - they could at least have had the decency to fake hangovers!!

For the rest of the time, I've been having massive issues with my internet at home - and been busy during the day so not even had much time for lunchtime blogging! I have been doing quite a bit in the kitchen - but because of my internet issues I've had to go to an old entry rather than any of the new exciting things I've been working on this week!

These pakora were the last thing I managed to deep fry before my oil finally gave out! Having this oil for deep frying has been a bit of an education since I first made the Guyanese Bakes - and I'm not sure my waistline has thanked me for it. I am very tempted to refill it immediately - primarily to make this szechaun squid again...

I have blogged pakora once before - though I got slightly snack happy... churning out huge Mushroom pakora, Courgette & Carrot pakora and Onion & Red Pepper pakora - as well as the 'typical' onion variety. We were eating them for days! This time round I made far far less, made each one a bit smaller, and quartered my onions instead of halving them so that they make smaller bundles. Bear in mind that the baking powder causes these to puff a bit - a heaped teaspoon of mixture will give a nice sized pakora... a tablespoon will make you a giant!!

Feel free to fidget about with the spices you use - I stuck to the basics here as I really wanted to emphasis the fenugreek - but make it as plain or as complex as you like!

Onion and Fenugreek Pakora

Makes about 15 pakora
  • 1 large onions, quartered then fairly thinly sliced
  • gram (chickpea) flour
  • 1/2 tsp baking powder
  • water to mix
  • 1 tsp black mustard seeds
  • 1 tsp chili powder
  • 1 tsp garam masala
  • 1/2 tsp dried fenugreek leaves
  • Large handful fresh fenugreek leaves, finely chopped
  • 1 tsp salt, or to taste
Heat the Oil...
As I'm frying these in a pot I don't have a proper temperature gauge - but the last time I made these in a deep fryer I cooked them at 175c.

Prepare the Onion Batter...
Put the onions in a large mixing bowl.

Mix the about 6 heaped tablespoons of flour, the baking powder and the spices together (including the dried fenugreek) and sprinkle over the onions.

Give it a good stir, them add a bit of water to make a fairly thick paste. You want the batter to be thick enough to cling to the onion, but not so thick that it clumps together too much (otherwise it will go stodgey in the middle). And if it's too thin the pakora won't stick together in the fat, and will separate into pieces... You might want to add another bit of flour, then another bit of water if you want more batter.

Tip!
Don't be tempted to make the batter in advance - the baking powder will be activated as soon as it is exposed to liquid. Make it just before use for best results!

Cook the Pakora...
Pick up teaspoonfuls of the mixture and slide into the hot oil. They will take 4/5 minutes to cook - turn them once or twice during cooking to ensure even colouring.

Serve!
Serve with a dipping sauce... or even better with two dipping sauces - one hot tomatoey and tangy sweet - the other creamy and cooling!

Sunday, 20 April 2008

No Croutons Required: Spicy Mushroom Bulgar Salad

Hello and Happy Sunday!

This will be a short post - I'm about to go out and mow the lawn... in a vain attempt to restore order to the jungle before my parents come to visit on Thursday! But on the positive side, it is gorgeous outside - I even managed to get my pics taken outside!

But I just realised that today is the deadline for No Croutons Required, jointly hosted by Lisa and Hollers. It's the third one - and a great event. This month the theme is mushroom soup or salad - I couldn't miss it!

So without further ado - I present...

Spicy Mushroom Bulgar Salad


  • 1 cup bulgar wheat
  • hot vegetable stock (approx 250ml - enough to cover the bulgar wheat by a cm or so!
  • 1 red chilli, finely chopped
  • 1 clove garlic, crushed
  • Approx. 500g mixed mushrooms - I used 2 portabellos, and equal amounts of oyster and chestnut!
  • 12 sun dried tomatoes, roughly chopped
  • Small handful of pinenuts, lightly toasted
  • 2 tbsp balsamic vinegar
  • 5 tbsp extra virgin olive oil
  • 1 tsp dried chilli flakes
  • maldon sea salt (or normal!)
  • rocket leaves
Make the Bulgar What...
In a dry frying pan, toast the bulgar wheat for a few minutes until it turns golden. Transfer to a bowl and cover with the stock. Cover and leave for 10 minutes. Check that it is cooked through and all the stock is absorbed - you may need to add more water and leave for a bit longer. Once cooked, fluff up well and cover.

Make the dressing...
Chuck the oil, vinegar, a couple pinches of salt and the chilli flakes into a jar and shake til emulsified. Or whisk it. It's really up to you!

** As soon as both the dressing and the bulgar wheat is ready, pour 1/2 the dressing into the bulgar wheat and mix well. Cover again and set aside.

Frying the mushrooms...
Prepare the mushrooms by peeling those that need peeled, cleaning those that need cleaned, and chopping into decent sized bits. Heat frying pan to a low to medium heat, add a glug of olive oil, then add the mushrooms. Fry slowly, stirring frequently. Once the water starts to come out of the mushrooms, add the garlic, chilli and a good pinch of maldon salt. Fry for another couple of minutes, then add to the bulgar wheat mix.

Putting it all together...
Add the sun-dried tomatoes and most of the pinenuts to the bulgar wheat and mix well. Use the remaining dressing to dress the rocket leaves. Put a handful on each plate. On top of that add the bulgar mix, and garnish with a few of the remaining pinenuts.


Right, got to go and make the most of this sunshine... by gardening!

Friday, 18 April 2008

Malaysian Vegetable Curry

It seems like ages since I've posted here! I've spent quite a bit of time this week trying to force my blog into a 3 column layout, and slowly pulling my hair out... Hence my earlier rant post!

I have also been sticking to my store cupboard challenge pretty well - I've limited eating out to a minimum, and even had four friends round for curry on Wednesday to help me out! However, a lot of the time, eating from my store cupboard seems to mean there is very little of interest to tell you about!

On Wednesday I invited the girls round for dinner - and there was only going to be two options... either pasta (to use up the kilos of the stuff I have discovered lurking in my cupboard) or curry (to use up the rice & tins of coconut milk) For either option, my kitchen was full of possibilities - frozen chicken or beef, lentils and other legumes, tinned tomatoes, a million spices and pastes so I knew I'd work out something. I was also ready for some vegetables and healthiness, so when I finally chose curry I decided that one of them would vegetarian - and here it is!

Malaysian Vegetable Curry

This makes loads! You could probably feed 6 as a main, or more as a side.
  • 2 cups lentils - washed (I used a mixture of red and yellow, if you use any other type note that it will probably affect the cooking time.)
  • 1 onion, thinkly sliced or chopped - it's up to you!
  • 3 cloves garlic, crushed
  • 1" piece ginger, grated
  • 3 thai red chillies - stalk removed, and halved lengthways
  • half head of cauliflower, cut into bite sized pieces
  • handful of green beans, washed and cut in two
  • 1/2 courgette, cut into chunks and fried over a very hot heat for a few minutes
  • 1/2 aubergine, cut into chunks and fried over a very hot heat for a few minutes
  • 1 tin coconut milk
  • 1 tin chopped tomatoes
  • 1 tbsp madras curry powder (Not what I would usually use, but I was using stuff up!)
  • 1 tsp tumeric powder
  • 1 tsp chilli powder
  • 1 tsp ground cumin
  • 1 tsp black mustard seeds
  • 1" piece of stick cinnamon
  • Either coconut oil/ ghee/ normal oil for frying - in that order of preference!
  • Fish sauce(opt!), salt and soy sauce to taste
In a large saucepan (this is a biiiiiiggg curry!) heat the grease of your choice over a medium heat. Add the mustard seeds * and keep moving until they start to pop, then add the onions and fry until soft. Add the ginger and garlic and cook for another couple of minutes.

* if you have them, chuck in a few curry leaves here - I thought I had some, but I had run out!

Add the lentils, chillies and chopped tomatoes and stir well. Add the rest of the spices and mix thoroughly.

Next mix in a little bit of water - just enough to make it properly wet. Hmmm.... I realise how rubbish that instruction is - but basically we're going to cook the lentils for a few minutes and they need water to expand into! I think I added about a cup overall. It doesn't really matter too much :)

Bring to the boil, turn to a simmer, and leave to cook for 10 minutes. (If you are using other types of lentils - extend the cooking time as appropriate here)

Add the cauliflower and the tin of coconut milk, again bring to the boil, turn to a simmer, cover and leave for 10 minutes.

Almost there!

I would fish out the cinnamon stick here - but feel free to leave it in if you want a more cinnamony flavour.

Add in the rest of the vegetables, taste and adjust seasoning with fish sauce, soy sauce and salt.

Simmer uncovered for another 5/6 minutes - or until the lentils and vegetables are cooked to your liking.

Serve with steamed rice and/or rotis.


Tuesday, 8 April 2008

Chilli Lime Mango!

I found this post by Kavs at The Girl Next Door yesterday, and was immediately interested!

Chilli... for desert!?? That's my kinda dish! And yay - I had all the ingredients to hand!

Mango with a Chilli Lime Kick!

I've departed slightly from the recipe - my mango was pretty ripe - so I diced it and squeezed a bit of lime juice of the pieces.

Then I mulched up half of a deseeded, finely chopped chilli with the zets of a lime and a tbsp of brown sugar.

Sprinkled it over the top, gave it a quick mix - bish bash bosh, job's a good un!

Ravioli with Walnut, Spinach and Porcini

So on my first proper cooking day of my Store Cupboard Challenge (I didn't think that Kraft mac n' cheese last night counted ;) I decided it was time to use up the block of white stilton that I had picked up at the weekend. I had never cooked with it before - but as it was only 30p from the deli counter, so figured I would work out a use for it!

I was going to make cheesecake with it, but my biscuits for the base had gone stale. So I set my mind to a savoury plan... What I really fancied was gnocchi, but I didn't have any potatoes. Eventually I hit on ravioli - but other than white Stilton, I couldn't think what to put in it! I wanted to keep it quite soft and rich - most of my available ingredients were too demanding for this!

The combination of porcini, spinach and walnut wasn't one I'd tried before - but the flavours worked well together. Though I think it was a little rich for a main - I think in future I would serve two or three as an appetiser.

Also, I had never made stuffed pasta before - but I'm happy to report it was fairly event-free!

On a completely separate aside, I went to bed fairly soon after eating this, and it did cross my mind to be concerned about cheese-induced nightmares... But that was not to be - I had very bizarre dreams, which were exceptionally vivid - but not bad at all! Today I found this article comparing the effects of eating British cheese on dreams - and according to the study 85% of females who eat Stilton before bed have very vivid and crazy dreams... So go on gals - knock yourselves out!

Ravioli with Walnut, Spinach and Porcini


I'm sending this over to Ruth at Once Upon A Feast for Presto Pasta Night - though I think she has put me to shame with her proper ravioli making equipment!
  • 250g white stilton
  • 50g dried porcini
  • 2 egg yolks
  • 1 large bunch spinach
  • 2 cloves garlic
  • 1 banana shallot
  • 1 small handful shelled walnuts, roughly chopped
  • 1 handful shelled walnuts, blitzed to crumbs!
  • 1 tsp corn flour, dissolved in a couple of tbsps water
  • 200g tipo 00 flour
  • 2 eggs
  • semolina flour for dusting
Pour a cup of boiling water over the porcini and leave to soak for 30 minutes, or until rehydrated. Strain, reserving soaking liquor.

Making the pasta!

In a blender, blitz half of the mushrooms to a puree. Heat some olive oil and fry the puree for a couple of minutes.

In the blender, mix the flour, mushroom puree and 2 eggs to make a dough - adding a little of the mushroom liquor if required. Remove from the blender, knead for 2/3 minutes until elastic, wrap in film and refridgerate for at least 30 minutes.

Take a look at my post on roasted garlic pasta for more details on making and rolling pasta - I won't write out the details again here!

The filling!

While the pasta is resting, use your blender (yes again! I can't imagine life without my kenwood! ;) to mix 200g of the white stilton and two egg yolks until fluffy.

Chop the shallot, crush one of the garlic cloves and finely chop the remaining porcini. Over a medium heat, fry these for a few minutes until soft. Add to the stilton mix.

Wilt the spinach for a couple of minutes until soft. Strain and squeeze to remove excess water. Add 3/4 of the spinach to the stilton mix reserving the other quarter for the sauce.

Blitz the mix a few times to combine the ingredients, then add the handful of roughly chopped walnuts.

Season well with salt and black pepper!

Make the Ravioli!
Roll out the pasta to the 3rd thinnest setting (See how to roll here!). Cut sheets into manageable sizes! Lay one sheet of pasta out, and place teaspoons of mixture onto it, leaving enough space round the edges to seal it.


Brush the edges with water, and lay another sheet of pasta on top. Starting from one end of the sheet, use a cupped hand to seal the stuffing inside the pasta - making sure there is no air pockets. Cut the raviolis out, trimming the edges as required.

The Sauce!
Dead easy - do this just before serving! Heat a glug of olive oil, crush the remaining garlic clove and fry gently for a minute. Add the remaining spinach, the strained mushroom soaking liquor and the cornflour mix. Stir in the rest of the walnuts, and bring to the boil, then crumble in the remaining stilton. Remove from the heat and stir to melt the cheese into the sauce.

Finishing the Dish!
Cook the ravioli in plenty of boiling salted water for about 3 minutes. Place into a warm dish and drizzle with some olive oil and some of the walnut sauce. Note that the walnut sauce is pretty rich - you don't need much!


Monday, 7 April 2008

Hummus Bi Tahina and a Discourse

I love hummus! I've tried a couple of times to make it at home - but it hasn't been as good as the stuff I can get from the wee Turkish shop round the corner. Until now!

Some random titbits about hummus for you...

It is also spelt hamos, houmous, hommos, hommus, hummos, hummous, chumus or humus. The most common Turkish spelling is humus - but as that means 'compost' in English, we generally stick to 'hummus'!

'Humus' is the word for chickpea! So if you make a hummus type dip with another legume - you really shouldn't call it hummus...

I got the above from a great post about hummus from Desert Candy. Check out the rest of the blog too - it's fab!

Traditionally hummus should be made with either tahine or olive oil - but not both! You should drizzle olive oil on the top of either when serving though. (Notice I actually did add a little bit of olive oil to mine !)

Someone has written a food blog - all about hummus!!

I think hummus is better the second day - when the flavours have had time to meld. Warning though - the hummus will probably thicken overnight - add some water to loosen before serving!

Hummus will keep for up to a week in the fridge.

Hummus is best made with freshly cooked chickpeas, but canned will work well too!

Hummus bi Tahina


  • 3 cups cooked chickpeas
  • 2 cloves garlic, crushed
  • juice of 1.5 lemons
  • 3 tbsp tahine
  • 2 tbsp olive oil (plus more for drizzling)
  • 1 tsp salt
  • paprika or cumin for serving
In a food processor, blend the garlic, tahine and salt, then add the lemon juice. Blitz til well mixed, then add the chickpeas. With the blender on medium, blend for 3/4 minutes. After the first minute or so, slowly drizzle in the 2 tablespoonfuls of olive oil. You want it to be light and fluffy, and creamy in colour. Add a little bit of water to loosen if required.

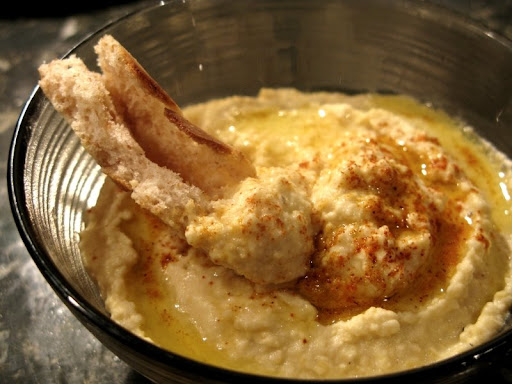
Serve drizzled with olive oil, a dusting of paprika or cumin, and pita breads. Though not necessarily the pitas I made that day!!


Hummus, served with one of my few successful pita breads!

Friday, 28 March 2008

Spinach Chana Dhal

Dhal, Dal, Daal, Dahl... They're all the same thing you know!

And that's tasty, cheap and healthy - no wonder they gave it so many names :)

I asked a friend to get me some dried chickpeas the other day - I've had an urge for home-made hummus since I had some at another friend's recently. But instead of chickpeas, I got a pack of chana dal (dhal, daal, dahl...)! There was a rationale - but I can't remember what it is now.

So I decided to make a dhal. As in the thick, spicy lentil stew - rather than the pulse itself...

And some naan bread to go with!

Spinach Chana Dhal


  • 1.5 cups chana dal
  • 1 tsp chilli powder
  • 1/2 tsp turmeric
  • 1/2 tsp cayenne pepper
  • 1 tsp coriander
  • 1 tsp cumin seeds
  • 1 tsp black mustard seeds
  • 3 cloves garlic, crushed
  • 3 slices fresh ginger (skin on)
  • salt to taste
  • 2 tbsp ghee
  • 1 tin chopped tomatoes
  • 100g spinach, washed
  • 1 tsp garam masala

Place the chana dal in a pot with twice as much boiling water and simmer for 30 minutes. (Alternatively you could pre-soak them for 2/3 hours... if you remember!)

Melt the ghee in a saucepan, and fry the mustard seeds, cumin seeds, garlic and ginger for 2/3 minutes until the mustard seeds start to pop.

Add the chana dal, the rest of the spices (except the garam masala!) and the tomatoes. Top up with boiling water and simmer, covered for 45 minutes to an hour - or until the chana dal is tender. Top up water as required, and stir every so often to prevent sticking.

When the chana dal is tender, remove the ginger slices and use a fork to mash some of the dal against the side of the saucepan. This gives a more interesting texture and consistency - don't skip it!

Add the spinach and garam masala and cook for another 3/4 minutes until the spinach is wilted.

Serve with rice - either plain or pilaf, or with naan bread!


Excuse the lurid photo - it looked better in real life!

Wednesday, 19 March 2008

Fennel Saffron Pilaf

This is one of my favourite accompaniments to Indian curries - so I thought I would give it a post of its own instead of sharing with another dish!

I made this last night to go with my left-over curry - excuse the rubbish dark photo, I don't know why it turned out like that... but was so hungry I was rushing too much to try to fix it!

You can use a stock instead of water - but I am usually too lazy - and it doesn't really need it!

Fennel Saffron Pilaf

  • Basmati rice
  • 1 tsp fennel seeds per portion
  • 1/2 tsp tumeric per portion
  • 1 tsp salt
  • pinch saffron (it is a strong flavour, be careful not to go overboard with this!)
  • Olive oil
  • ghee
Heat the ghee and olive oil in a saucepan with a tightfitting lid. (Using ghee on it's own can be a bit overpowering, but it's nice to use a bit!)

Add the fennel seeds and fry until they start to brown. Add the basmati and fry for a couple of minutes. Keep it moving so all the grains get coated, and to stop it sticking or burning.

Add the tumeric, saffron and salt then mix well. CAREFULLY pour boiling water over the rice (it will spatter!) In my pot the water should come about an inch above the surface of the rice - you might need to experiment a little til you get it perfect with your pot. Don't worry if you add a bit much or little - it can be fixed later!

Cover and leave to cook for 10 minutes. After this time is up, remove the lid and check how cooked the rice is. You also want to check the water situation - using a fork, pull the grains away from the side of the pot and see if any water is left at the bottom.

Hopefully the rice is perfectly cooked and the water is pretty much gone (a little bit left is ok). In which case, mix well, replace the lid, turn off the heat and leave for 5 minutes. This really helps the rice fluff up.

If the rice isn't cooked yet, add a bit more water if required, replace cover and cook for another couple of minutes.

If its cooked but there is water left, pour the excess off, mix rice well, replace lid and leave for 5 minutes.

Voila!

Monday, 17 March 2008

No Croutons Required: Chillies, Spice and All Things Nice

Hmmm...

So yesterday I realised that the deadline for No Croutons Required is fast approaching. Spicy vegetarian soup. I can do that. In fact, I make spicy soup pretty much every week - at least once. I had already made spicy Thai soup in the last week for Presto Pasta Night. Yay - an excuse to make more soup!

I considered various options. Asian soup was out - I made some pretty recently and I had it for lunch yesterday! Hmmm... spicy lentil soup, tomato soup? Nah, wasn't feeling the lentil/tomato love...

I realised that what I actually wanted was curry. A thick, smooth, spicy, rich curry soup...

So I have adapted one of my favourite curry recipes, and turned it into a soup. It is still pretty much a whole-meal soup - the potatoes and chickpeas add some real bulk. Serve with some nan bread, and you're sorted!

It wasn't until I took the pictures that I realised that my soup looks very similar to last month's NCR entry... So now I feel like I'm being dull and unoriginal... Am I a one-soup pony?? Tune in next month to see if I can escape the spinach!

Curried Chickpea & Spinach Soup with a Cilantro and Chilli Drizzle

Makes a lot of soup! Probably 4 big bowls - or 6 normal ones...
  • 400g tin tomatoes
  • 3 cloves garlic
  • 2 medium/large onions
  • 3 tbsp ghee
  • 1 tbsp salt
  • 1 piece fresh ginger (about 2 inch long)
  • 1 tsp red chilli powder
  • 1 tbsp ground coriander
  • 1 tbsp ground cumin
  • 1 tbsp paprika
  • 1 tbsp tumeric
  • 500 ml vegetable bouillion
  • Large bag spinach, washed
  • 3 green chillies
  • small handful of chopped cilantro
  • 2 tbsp olive oil
  • 2 medium potatoes, diced
  • 400g tin chickpeas
  • 1 tsp garam masala
Heat the ghee, chop both the onions, and fry over a medium for about 15 minutes, until soft.

Meanwhile, peel and roughly chop the ginger and garlic. In a liquidiser or blender, blitz the ginger and garlic with the tomatoes and about a quarter of the stock. Once the onions are ready, add them to the tomato mix and blitz it all to a smooth puree.

Return the puree to the pan, add the salt and simmer for 30 minutes.

Add the chilli powder, paprika, turmeric, ground cumin and ground coriander and mix thoroughly. Simmer for another 15 minutes.

Add the diced potatoes and chickpeas, then gradually stir in the stock until you get the consistency you want. (I kept it pretty thick - it was going to be my dinner!) Continue to cook until the potatoes are soft.

Meanwhile, wilt the spinach and blend to a puree. Add to the soup, taste and adjust seasoning if required. Add the garam masala.

To make the cilantro chilli drizzle, blend the cilantro with the chillies and olive oil.

Serve the soup with a drizzle of ... erm... drizzle (!) and garnish with a few cilantro leaves and a sprinkle of cumin!

Wednesday, 6 February 2008

Italian Cookery Course: La Ribollita

This recipe is adapted from a recipe I was given at my Italian cookery course by Francis Adou.

This is a 'proper' winter soup - full of lovely winter vegetables! Ribollita means 're-cooked' in Italy, from looking on a few sites on the internet, it seems that the traditional method of cooking is as follows:

  • Make basic soup (as per recipe below) - this is basically a typical minestrone soup.
  • The next day, spoon the soup into a baking dish and layer with slices of bread - scatter with sliced red onion and bake until the top is crunchy and golden. Some non-traditional methods add cheese here!
  • On the third day, break the bake up so that the bread is broken into the soup - it should be thick enough to eat with a fork!

Another re-cook method I read was to put more vegetables and water into the pot each day and cook for another hour - not so sure about the health and safety of this - I guess you can still only do it for 3 days or so!

I didn't do either re-cook method this time - I ate it all as it was on the first day (with help of course!) But I do like the sound of a variation each day - so will give this a go next time!

Making sure everything is cooked veeerrryyy slowly is really important to get the best taste out of all the vegetables.

La Ribollita


  • 1 400g tin of cannellini beans, drained and rinsed
  • 1 large onion, finely chopped
  • 2 carrots, finely chopped
  • 2 courgettes, finely chopped
  • 2 stocks celery, finely chopped
  • 2 cloves garlic, crushed
  • 1 large potato, diced
  • 1/2 savoy cabbage, shredded
  • 200g chopped tomatos (either tinned or fresh - I used fresh!)
  • 1 spring onion, chopped
  • Thyme, sage, rosemary - fresh or dried
  • Dried red chilli, to taste
  • Butter and olive oil for frying
  • salt and pepper, to taste

Heat a knob of butter and a glug of olive oil in a soup pan.

Add the onion, garlic, carrot and celery and sweat over a very low heat for 10 minutes until soft, then add the spring onion, cabbage, potato and courgette and cook for a further 10 minutes, stirring frequently.

Add the beans, tomatoes, herbs and chilli, then add 1 litre of water and season. Bring to the boil, then simmer until all the vegetables are cooked through.

Taste and adjust seasoning if required.

At this point, you can serve the soup as it is - however, you may want to blend or mash some of it to get a different consistency. This time I left is all whole, however, next time I'll probably try blending 50% of it to see how it turns out!

No Croutons Required: Spinach and Garlic Soup

As soon as I heard about the new blog event: No Croutons Required I knew I was going to like it! It is about vegetable salads and soups - and every month is going to have a different theme. Now I love soup (I think it's such a Scottish thing - a huge vat of broth to line your tummy on a chilly day!) and was excited to get an excuse to go home and make some! (Even though what I should have done was go home and do housework as I have a parental visit today... Never mind - my dad likes soup too!)

No Croutons Required is being jointly run Lisa of Lisa's Kitchen and Holler at Tinned Tomatoes and this month we're making... Vegetarian Soup!

I made Spinach and Garlic Soup - hot, thick, filling and healthy! I started making this when I was a student - it evolved from potato and leek soup (!) when I tried to force more nutrients in. I still love it - I ate some of it last night, and have some here at work in a flask for when I've finished writing this. Served with a hunk of crusty bread, it's a meal in itself!

Spinach and Garlic Soup


As always, quantities are approximate - add more potato for a thicker soup, or more stock for a thinner one. I usually make this as a one-pot soup, but because the spinach was really sandy, I decided to cook it separately just to ensure all the grit was removed.

My gorgeous spinach - but how much sand???!
  • 2 big bunches of spinach - I usually use a large bag from the supermarket, but managed to pick some up fresh - yummy!
  • 1 kilo floury potatoes, peeled and cut into large chunks
  • 1 onion, finely chopped
  • 4 cloves garlic, crushed
  • 1 litre of vegetable stock - I made mine from Roast Vegetable Bouillon concentrate
  • Salt and plenty of black pepper
Wash Spinach thoroughly (took me ages!!) Roughly chop, place in a pan and cover in boiling water. Allow to boil for 2/3 minutes, then refresh in cold water. Blitz drained spinach along with a cup or so of water to a purée and set aside.

Gently fry the onion and garlic in a little butter or olive oil until soft, then add the stock, about a teaspoon of salt and a good few grinds of black pepper.

Add the rinsed potato chunks, bring to the boil and cook until soft.

Remove the potatoes from the stock with a slotted spoon and mash. I actually used a ricer to do mine - mostly because it was at the front of my utensil drawer!

Return the potatoes to the stock mix and stir well. Taste, and adjust seasoning as required.

Add the spinach purée, taste again, and serve! You could add a swirl of cream, or a grating of parmesan to the top of this, or leave it bare - it will taste good any which way!

Now how easy was that??

Thursday, 31 January 2008

Sri Lankan Workshop: Coconut Rotis

To accompany the spicy, piquant tomato sambal and creamily delicious paripoo, we made some coconut rotis.

I'm not usually a fan of coconut meat (although I adore coconut milk and coconut based curries!) but these were really good - and complimented the two sauces very well.

The biggest challenge is trying not to eat them as they come out of the pan ;)

Coconut Rotis


225g plain flour
1/2 tsp salt
180g freshly grated coconut (use a processor for this if you can - otherwise it'd be a lot of hard work!)
30g softened butter (optional)
2/3 green chilies - finely chopped (optional)
2 tbsp finely chopped onions
Coconut oil for frying

In a bowl, mix together the flour, coconut and salt, then add just enough water to form a dough. If you have any of coconut milk left you could use some of that here (either from the paripoo, or the real stuff from cracking the coconut open!). The tutor used some 'real' coconut milk, with some coconut milk from a tin, mixed in with a bit of water.

You want the mixture to be very soft, but not so sticky that it sticks to the work surface.

Work in the onions, butter, and chilies (if using). You may need to add a bit more flour now if the mixture is too wet.

Knead for 5 minutes, them leave to rest for about 20 minutes.

Divide the mixture into 10 balls.

Heat a heavy-based frying pan until very hot, and add some coconut oil. If you don't have any oil, then you could use ghee instead. As you do each ball, only add oil if required, you probably shouldn't need to for each one.

For each ball:
  1. Roll out until about 5mm thick. The way we did this in class was to place a ball between two sheets of greaseproof paper, then used our fingers to spread it out.
  2. Peel the roti from the paper and place in the centre of the pan.
  3. Cook for 1 minute
  4. Turn with the spatula and cook for a further minute on the other side.

Serve with a Sri Lankan curry (or curries!) of your choice!

Sri Lankan Workshop: Paripoo

At the Sri Lankan Cookery workshop I recently attended I fell madly in love with this simple, easy and gorgeous curry! It was sooo good - creamy, spicy, comforting, and above all, packed with flavour.

My pictures just don't do justice to the vibrant colour of this dish (although thanks to some great feedback from Jill over at Simple Daily Recipes, I will hopefully be getting more real light to them soon! Thanks Jill!)


Paripoo - Sri Lankan Dhal!


  • 90g red lentils
  • 1/2 tsp turmeric
  • 2 dried red chilies, left whole.
  • 8 curry leaves
  • 1/2 tsp salt
  • 3 cloves of garlic, thinly sliced
  • 1 onion, finely chopped
  • 100 ml water
  • 1/2 tin coconut milk
Ok, so how simple is this???

Are you ready?

Put all the ingredients into a pan, except the coconut milk.
Simmer for 15 minutes (stirring frequently to prevent the lentils sticking)
Add the coconut milk
Cover and simmer for another 15 minutes.

There you go - a gorgeous curry, made from scratch in half an hour!

Sri Lankan Workshop: Tomato Sambal

This was the first dish we made in the Sri Lankan workshop I attended recently. I got to use an ingredient I hadn't seen before - coconut oil. Apparently coconut is widely used in Sri Lanka and neighbouring counties - it isn't until you go further north that the use of coconut oil begins to be replaced with ghee.

It is lovely stuff - and not too difficult to find! I managed to buy a bottle of it from the first wholefood store I went to. Check out the link above to read about other uses it has!

Tomato Sambal


  • 3 large ripe tomatoes (approx 225g)
  • 1 tsp salt
  • 1 tsp chili powder - adjust according to taste and strength
  • 4 cloves of garlic
  • 5cm cinnamon stick
  • 2 tbsp coconut oil
  • 1 onion
  • juice and zest of one lime
  • 1 tsp sugar
Slice the tomatoes and arrange them on a plate. Sprinkle with the chili powder and salt and leave to marinate while you prepare the rest of the ingredients.

Slice the garlic and finely chop the onions.

Heat the coconut oil in a saucepan to medium. Once hot add the sliced garlic and fry until starting to change colour. Add the cinnamon and continue to fry until the garlic has turned golden brown. Don't let it burn though, or it will turn bitter!

Add the onions and continue to fry until soft.

Now add the marinaded tomatoes and gently simmer for 15 minutes.

Remove from the heat, allow to cool slightly then add the lime juice, zest and sugar. Boiling the lime juice will lose a lot of its punch, so only add after cooking.

Serve as part of a Sri Lankan meal - usually alongside curry.


Tuesday, 29 January 2008

11-a-Day Roast Veggie Stew!

I've no idea if this is in fact a stew, or a thick soup, or a chunky sauce.

What I can tell you is it is healthy, filling, versatile and tasty!

Every couple of weeks I get an urge to eat a huge portion of vegetables. Usually on a Monday, and usually after a particularly unhealthy weekend! This generally takes one of two routes - go to local greengrocers and buy lots of gorgeous veg and make a mammoth stirfry... or go to local greengrocers and buy lots of gorgeous veg and roast them all into a sloppy, tasty mess! Admittedly the first option is healthier - but the second is much more comforting! I use olive oil spray to cut down the amount of oil I use.

So I wandered home from work on Monday night fully intending to make a spanish fish stew (which will just have wait!) but got sidetracked by the idea of veg and instead ended up with...

... My 11 a Day Roast Veggie Stew


You can use any veg you want in whatever quantities you want - just pick what you enjoy/have available. There are lots of additions - I often fry up some chorizo (at the same step I fry the mushrooms here), or add some type of legumes to pad it out.

Veg I roasted:
  • 2 large tomatoes
  • 3 parsnips
  • 2 red onions
  • 1 red bell pepper
  • 1 yellow bell pepper
  • 3 red turkish chilis
  • 1 mild green turkish chili
  • 2 carrots
  • 2 courgettes (zuccinis!)
  • 1 head of garlic

Veg I pan cooked:
  • 2 large tomatoes, roughtly diced
  • 150g chestnut mushrooms, halved
  • 1 scotch bonnet chili, finely chopped

Other:
  • 3 tbsp balsamic vinegar
  • 1 tsp sugar
  • 1 tbsp tomato paste
  • salt/pepper,dried chili flakes
  • 150 ml vegetable stock

Lightly spray two oven trays with olive oil. (Or you could do three if you have three shelves in your oven!)

Decide what veg you want to roast - then cut it into pieces such that it will all become ready at the same time. As the greengrocers had another good deal on garlic, I also used this opportunity to roast up 6 heads of garlic. Alternatively, chuck a crushed clove or two in with the mushrooms!


Lay the veg out on the greased trays, the mist in olive oil again. Season and spice as required! This time I used white pepper, salt and red chili flakes, either singularly or all, depending on the veg (i.e. I don't salt carrots or peppers, but other veg can take a lot of seasoning.)


Put in the oven at about 200c for about 40 minute. Turn or shake the veg as appropriate during cooking!

Meanwhile, spray a little oil into a medium hot pan, and toss in the halved mushrooms. Fry for a few minutes until cooked through. Add the other pan veg and tomato paste and allow to cook for a few minutes.

Add the balsamic vinegar and sugar and allow to reduce slightly, then add the stock. allow to simmer for a further 5 minutes. Take off the heat until the other veg are roasted.

Once the oven veg is ready, tip it all into the pan and stir to mix. Heat through, and adjust seasoning if required (remember the roast veg were well seasoned, so don't season sauce until this stage!)

You can serve this as it is - with lots of crusty bread.

You could also blend it up and add more stock to make a nourishing soup.

Or split in half, blend one half, and mix back together to make a lovely roast veg sauce!

Whatever you do with it - enjoy!

Monday, 21 January 2008

Mixed Pakora

Pakora are a deep fried south asian snack that were available at any Indian restaurant in Scotland when I lived there. (And I'm sure still are!) We even used to get haggis ones - they shouldn't work, but they soooooooo did! Now that I am down on the South Coast of England pakora are much more difficult to get a hold of - the closest thing you can get is onion bhaji... though I personally don't think they even comes close to pakora!

Pakora can be made from various different food stuffs - onion, spinach, chicken, fish, potato, cauliflower, mushroom etc - and is often made from a combination of two or three. The veg is bound by a gram flour spiced batter and deep fried.

I had an urge to make some last Friday night as I was staying at Boyfriend's (who has a deep fat fryer!), and chose onion, mushroom, courgette and carrot, and potato and pepper. Now I admit the last two varieties are not traditional, but I thought they might work... and they did!

Pakora keep for a few days in the fridge, and can also be frozen.

I don't weigh anything out when making things like this - so much depends on the size and wetness of the veg you use - and the spicy flavour you want from the end result. I made up the batter slightly different for each type - though each of them had garam masala and dried fenugreek leaves. Over all I think I used about 600g gram flour, 2.5 large onions, 1 large potato, 3 chillies, 1 carrot, 2 courgettes and 12 mushrooms. They made about 36 large pieces of pakora - I reckon they would have fed at least 12 people as a starter :)

Serve with a wedge of lemon to squeeze over and a simple green salad.

There are many different sauces you can get to accompany pakora. I often just buy them in from the Indian deli round the corner. However, if I don't manage that, I have two simple ones that I can knock up in minutes. (Again, I apologise to the traditionalists!)

1) Raita - mix plain yogurt with finely diced cucumber (remove the seeds), a handful of mint and a squeeze of lemon juice for a cooling dip.
2) Mix tomato ketchup with lemon juice, tabasco sauce and dried red chile flakes for a hotter sauce to dip into.


Before you start, preheat your deep fryer to 175 degrees celcius.

Onion Pakora

2 large onion, halved and thinly sliced
gram (chickpea) flour
water to mix (not too much!)
garam masala
dried fenugreek leaves
ground cumin and coriander
small handful roughly chopped coriander
dried red chile flaked to taste
1/2 tspn baking powder
salt

Place onions in a large mixing bowl.
Sprinkle over 2 large handfuls of gram flour, the baking powder, a good pinch of fenugreek leaves, all the spices you want to use. Give it a good stir, them add a bit of water to make a fairly thick paste. You want the batter to be thick enough to cling to the onion, but not so thick that it clumps together too much (otherwise it will go stodgey in the middle). And if it's too thin the pakora won't stick together in the fat, and will separate into pieces... You might want to add another bit of flour, then another bit of water if you want more batter.


Make sure you salt the batter at this stage - as you can't really add it afterwards. To check the seasoning you'd have to deep fry a little bit of the batter for a minute or so and taste. I probably added a teaspoon.

Carefully drop spoonfuls of the mixture into the hot oil, and cook for about 6 minutes. They can be kept warm in the oven til ready to eat.


Mushroom Pakora

This time, start off by mixing the gram flour with a bit of water to mix to a thick batter, then add the baking powder, spices, fenugreek and salt. I kept my mixture quite similar this time - but added more dried red chillies for a bit of extra heat. Remember, there is much more veg to batter in this one, so you can flavour it more strongly.

Add the mushrooms and stir to thouroughly coat.

Drop the mushrooms into the hot oil, and again, cook for about 6 minutes.


Courgette and Carrot Pakora

Mmmmm - I absolutely loved these - they were gorgeous and moist in the middle, with a proper crunch on the outside!

Grate the courgette, place in a sieve and sprinkle with salt to draw out the excess juices. Squeeze them dry and place into a bowl with the grated carrot. As before add gram flour and water until you have a thick batter. Add the fenugreek, spices, baking powder, and a handful of chopped coriander. For this one I omitted the dried red chile, but added one scotch bonnet chile pepper, finely chopped. I even left the seeds in as I wanted some heat! ;)

Cook as before.

Onion and Red Pepper Pakora

Chop a large potato into 1cm dice, and par boil for 3 minutes until slightly softened. Thinly slice half an onion and add to the drained potatos. Finely dice a red pepper and add to the other veg.

I then added 2 thai red chiles - finely chopped, a large handful of coriander, and one crushed clove of garlic.

For spices, I added garam masala, fenugreek leaves, tumeric, cumin and coriander.

Mix all the above with gram flour and baking powder to form a thick batter - adding water as required.

Deep fry as above.